Just having a little break from the never-ending job list that I need to complete today to wish all my lovely followers/readers A Very Merry Christmas!
I managed to complete the boys backpacks, but unfortunately I wrapped them before taking any photos!
I hope you all managed to finish your Christmas makes!
Have a lovely time, will catch up in the new year!
Saturday, 24 December 2011

Wednesday, 9 November 2011
Some more Christmas gifts...


I still need to practice my free-motion skills, as my stitches are far too small. All the advice I read said to set stitch length to zero (including the instructions in my old Bernina manual) but I think I need to set my stitch length to 1 or 2 next time. I used a grey guttermans top thread and white bobbin (as I only have 2 bobbins that Miss Nina will allow me to use and can not always be bothered or want to waste a ton of thread just to change colour, on this occasion both bobbins had plenty of white thread on them). The stitching came out like pencil drawing and I am actually pretty pleased with my pretty ballerinas! Kirsty eat your heart out lol!

 | ||
| I must have taken over 10 photos of this pair of models - they were not happy at having their photo taken whilst wearing a "girl" on their back, anyway after a sweetie (or 2) it was a (slightly) different story! |

They have lots of toys & clothes so I am making them each a little baking hamper for Christmas. The aprons I bought in the Summer at a "strawberry fayre" in my Aunt's Wawickshire village. They were brand new with tags, from Laura Ashley and I think cost me 50p each!! I added their names by using Word Art in MS word/office and a cursive font. I then traced the (reversed) names onto bonda web and ironed it onto my fabric before cutting out. The names were then free-motion appliqued onto the apron/pockets.
Tuesday, 11 October 2011
First Christmas 2011 make

I adapted a pattern from a back issue of sew hip magazine. The pattern was only 2D, so the dinosaur had only 2 legs. So I made a belly by lots of experimenting with paper and a couple of attempts later I did it!!!
I stuffed his feet, head and tail with pudding rice to give it a bit of weight. Only once I had finished did I think about the practicalitles of a child's toy that is made from dry clean only wool tweed and stuffed with pudding rice! Hmm hopefully we won't have to cross that bridge!


I googled the tweed fabric and it is a very luxurious blend of wool, cashmere and angora. I am saving the rest to make myself a bag.
Vintage Linen Quilt update

So this was the beginning of my little collection. I now have quite a few traycloths, napkins, tea towels & hankies (all gathered from carboots and charity shops) and have made a start on my Vintage Linen Quilt. I have steered clear of tablecloths as I didn't think that I would have the guts to chop into them!

 |
| I forget to follow the instructions so the basket caused me a few problems. I pieced it upside down and it was very fiddly to resolve! |

a belated round-up of "Quilting-on-the-go" course
Some time back in late spring, I took part in a two day "Quilting-on-the-go" course led by Carolyn Forster at Threadbear near Croydon.
Threadbear is a gorgeous shop full of all things knitting and sewing related. There is a big selection of wools at the front of the store and many folders of patterns - not books but single patterns. (I don't knit, but the people that I know do knit, often complain that they have to buy whole books these-days rather than a single pattern) The middle of the store is full of cross stitch, embroidery and tools/ other supplies, whilst the back of the shop is stuffed with fabrics and the work-shop area.
Carolyn was a very patient and informative teacher. She showed us lots of samples to get started. I showed Carolyn my stash of old linens & talked about a possible quilt block pattern. I ended up making only one block on the first day as I was so indecisive, although it was great watching everyone else. A couple of ladies had chosen the same pattern but different fabrics and it was fascinating, just how different the quilt blocks looked.In the afternoon, we were taught how to quilt the individual blocks. This is the block that I made on the first day of the course. (sadly still not quilted!) All of Carolyn's blocks for QOTG finish at 16-17 inches.

Between the two course dates, we needed to go home & make some more quilt blocks. (pieced and quilted) I was very busy with work stuff - report-writing time :( and didn't have the time I needed to concentrate on my vintage linen blocks, so I used a charm pack and some "jelly roll" strips that I had left over from my first ever quilt and followed the same pattern. I managed to piece & quilt 10, 17 inch blocks in a couple of evenings.
 On the 2nd way, we were taught Carolyn's "quiting on the go method" to join all the quilted blocks together. It is a mixture of machine and hand sewing. This quilt will be square, 3 blocks X 3 blocks with one block left over to either make it into a quillow or to make a matching pillow. I have started sewing the blocks together, and now have to sew the rows together. However, this is something that will have to wait till after Christmas.
If you are unable to get to one of Carolyn's courses but are interested in the Quilting on the go method, Carolyn has a book and book2 is due out next year sometime.
Threadbear is a gorgeous shop full of all things knitting and sewing related. There is a big selection of wools at the front of the store and many folders of patterns - not books but single patterns. (I don't knit, but the people that I know do knit, often complain that they have to buy whole books these-days rather than a single pattern) The middle of the store is full of cross stitch, embroidery and tools/ other supplies, whilst the back of the shop is stuffed with fabrics and the work-shop area.
Carolyn was a very patient and informative teacher. She showed us lots of samples to get started. I showed Carolyn my stash of old linens & talked about a possible quilt block pattern. I ended up making only one block on the first day as I was so indecisive, although it was great watching everyone else. A couple of ladies had chosen the same pattern but different fabrics and it was fascinating, just how different the quilt blocks looked.In the afternoon, we were taught how to quilt the individual blocks. This is the block that I made on the first day of the course. (sadly still not quilted!) All of Carolyn's blocks for QOTG finish at 16-17 inches.
Between the two course dates, we needed to go home & make some more quilt blocks. (pieced and quilted) I was very busy with work stuff - report-writing time :( and didn't have the time I needed to concentrate on my vintage linen blocks, so I used a charm pack and some "jelly roll" strips that I had left over from my first ever quilt and followed the same pattern. I managed to piece & quilt 10, 17 inch blocks in a couple of evenings.

If you are unable to get to one of Carolyn's courses but are interested in the Quilting on the go method, Carolyn has a book and book2 is due out next year sometime.
Thursday, 22 September 2011
stich, rip, stitch, rip, stitch, rip, stitch, rip, spend,
and so on....
grr.... Been having quite a few problems quilting this quilt that I pieced together last year!

 This is Miss Nina (the Bernina) She is a bit of a temperamental old gal and likes everything "just so", she is a bit stuck in her ways and doesn't like to try anything new. Forget any thread that isn't Guttermans and don't even bother loading ANY of the other bobbins, except the one being used right now. (a real pita). And she HATES you playing with the tension dial, just as well that the tension doesn't usually need to be adjusted!
She is a very rare "flatbed" model (so the repair man told me) with most Berninas of that vintage being "free arm" models. Now, I can see the advantage of having a free arm model, but what would have been the advantage of having a flat bed model?? A curtain maker rather than repairer/dressmaker???? Anyone know??
My Mum acquired her from the Sewing Machine shop in Shepherds Bush (which is still there btw, just a stones throw away from all the fabric delights on Goldhawk Rd)
Sadly she has know idea what she paid for it, but as we were pretty brassic (poor) when I was a kid, it must have been fairly reasonable in todays money. She said it was slightly over her budget but she still felt that she had got a really good bargain.
now where was I...
I basted the quilt at the weekend. I had two DH free evenings this week, so |I could sew without anyone moaning about 1) the noise of the machine and 2) "are you going to talk to me tonight"
However, I have spent every night sewing & then unpicking :(
I just could not get the tension sorted. Tried new needles, cleaning, oiling, tension dial tweaking everything the books (or mr google) recommends. (and Miss Nina Hates)
So today, I called into my local quilt shop & asked for their advice. They were really helpful and came to the conclusion that it was probably the blue fabric causing most of the problems. I bought it in Fabricland purely for the colour. The label said "composition unknown" but after washing it was apparent it was quite synthetic. It is also heavier than the quilting cottons with a very close weave.
So the advice was to switch to a blue thread (I was using a bright yellow for contrast) and try much smaller needle size. I have to rebaste the quilt after all the sewing & unpicking, but once I get started I will let you know how I get on.
On my way out I spotted this amazing quilt/hanging... (sorry I didn't get an actual photo)

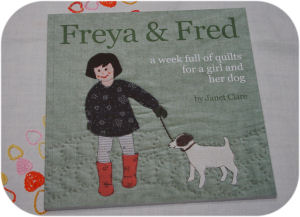
 It is from this book by Janet Clare
Which I added to my shopping bag alongside the said blue thread. (just don't tell DH!)
I have my Mum's 60th next year and the designs are also something that the MIL would really love. It would be so easy to make the little characters look just like the Grandkids. My mind is already whirring away with ideas.
There are some book reviews here and here. (where I "borrowed" the above photos from)
grr.... Been having quite a few problems quilting this quilt that I pieced together last year!


She is a very rare "flatbed" model (so the repair man told me) with most Berninas of that vintage being "free arm" models. Now, I can see the advantage of having a free arm model, but what would have been the advantage of having a flat bed model?? A curtain maker rather than repairer/dressmaker???? Anyone know??
My Mum acquired her from the Sewing Machine shop in Shepherds Bush (which is still there btw, just a stones throw away from all the fabric delights on Goldhawk Rd)
Sadly she has know idea what she paid for it, but as we were pretty brassic (poor) when I was a kid, it must have been fairly reasonable in todays money. She said it was slightly over her budget but she still felt that she had got a really good bargain.
now where was I...
I basted the quilt at the weekend. I had two DH free evenings this week, so |I could sew without anyone moaning about 1) the noise of the machine and 2) "are you going to talk to me tonight"
However, I have spent every night sewing & then unpicking :(
I just could not get the tension sorted. Tried new needles, cleaning, oiling, tension dial tweaking everything the books (or mr google) recommends. (and Miss Nina Hates)
So today, I called into my local quilt shop & asked for their advice. They were really helpful and came to the conclusion that it was probably the blue fabric causing most of the problems. I bought it in Fabricland purely for the colour. The label said "composition unknown" but after washing it was apparent it was quite synthetic. It is also heavier than the quilting cottons with a very close weave.
So the advice was to switch to a blue thread (I was using a bright yellow for contrast) and try much smaller needle size. I have to rebaste the quilt after all the sewing & unpicking, but once I get started I will let you know how I get on.
On my way out I spotted this amazing quilt/hanging... (sorry I didn't get an actual photo)
Which I added to my shopping bag alongside the said blue thread. (just don't tell DH!)
I have my Mum's 60th next year and the designs are also something that the MIL would really love. It would be so easy to make the little characters look just like the Grandkids. My mind is already whirring away with ideas.
There are some book reviews here and here. (where I "borrowed" the above photos from)
Wednesday, 14 September 2011
the morning-after-the-night-before make
I have found the perfect hangover cure!

This was a kit that I bought at last years Knitting & Stitching Show at Alexandra Palace. I think it was bought from The Bramble Patch.

The boys were at Nanny's as we had been to a wedding the day before. So whilst Mr Tam laid in bed nursing his hangover (or in his words "catching-up" on his sleep from a heavy working week lol) I got stuck into this project. T'was pretty easy and was finished before the boys returned home after having lunch at Nanny's.
 and The Little Man was very pleased with the end result! Even managed to find a posh trouser hanger to hang it up with!
I have just spotted the panel on ebay if anyone was interested - it is from a range called "kate & nate". (there is also a girl version)

This was a kit that I bought at last years Knitting & Stitching Show at Alexandra Palace. I think it was bought from The Bramble Patch.

The boys were at Nanny's as we had been to a wedding the day before. So whilst Mr Tam laid in bed nursing his hangover (or in his words "catching-up" on his sleep from a heavy working week lol) I got stuck into this project. T'was pretty easy and was finished before the boys returned home after having lunch at Nanny's.

I have just spotted the panel on ebay if anyone was interested - it is from a range called "kate & nate". (there is also a girl version)
Subscribe to:
Posts (Atom)